
State Fair

State Fair Ribbons
Monday, July 4, 2011
Flag Cake
Just a prepared yellow cake mix (I added a 1/4 teaspoon of almond extract), cool whip, and fruit. So easy! You can use any type of fruit for a summer dessert. Pears, nectarines, peaches, raspberries, even grapes and plums would be good! If you have not tried a yellow cake mix, you should. It is my favorite cake to use for whipped cream and fruit. I'm not fond of other boxed mixes, but yellow cake mix is special. I used Duncan Hines for this cake, but I've used other brands as well.


Sunday, July 3, 2011
Blueberry Sour Cream Pound Cake and Happy almost 4th of July
I know there is a cake doctor out there, but I also enjoy doctoring. I doctored Blueberry Sour Cream Pound Cake, a recipe found on Taste of Home . It is excellent for the 4th of July desserts lineup.
For the red, white, and blue theme, the only time-consuming part of this recipe is drying the raspberries, but they are easy to use because you don't need to cut them or core them like strawberries. I line a cookie sheet with paper towels and set them on it. I used an 8x8 pan for 1/2 the recipe, but I think 9x9 would have been better-the cake was too thick for the 8x8 so the edges were done long before the high center.


1 cup salted butter, softened
2 3/4 cups sugar
6 large eggs
1 cup sour cream (I don't skimp on this..I use full fat...it is a pound cake!)
1/4 teaspoon baking soda
1/2 teaspoon salt
3 cups all-purpose flour (I used 2 cups AP flour and 1 cup Whole Wheat PASTRY flour)
1 teaspoon vanilla extract
1 teaspoon almond extract
2 cups fresh or frozen blueberries-you could probably use 2.5 cups also
Optional: Extra sugar or cinnamon sugar to sprinkle on top before baking
Topping:
2 regular 8 oz size containers of cool whip or one large container
1 pint fresh blueberries washed and dried
1 pint fresh raspberries washed and dried
Directions
For the red, white, and blue theme, the only time-consuming part of this recipe is drying the raspberries, but they are easy to use because you don't need to cut them or core them like strawberries. I line a cookie sheet with paper towels and set them on it. I used an 8x8 pan for 1/2 the recipe, but I think 9x9 would have been better-the cake was too thick for the 8x8 so the edges were done long before the high center.
Drying raspberries.


I used an 8x8 pan for this, but I think a 9x9 would have been better.

Finished product (I sampled a corner-can you find it?)

Recipe for 9x13 or 10 inch tube pan:
Topping:
2 regular 8 oz size containers of cool whip or one large container
1 pint fresh blueberries washed and dried
1 pint fresh raspberries washed and dried
Directions
- In a mixing bowl, cream butter until fluffy; gradually add sugar and mix well. Add eggs, one at a time, beating well after each addition. Beat in extracts.
- In a separate bowl, combine flour, salt, and baking soda. Add alternately with the sour cream to wet ingredients. Gently fold berries into batter.
- Spoon into a greased 10-in. tube or 9x13 pan. Bake at 350 degrees F for 50-70 minutes or until cake tests done. (In my 9x13 pan this took about 52 minutes.)
- Cool cake completely. Frost with cool whip. Add fruit in whatever design you like. Refrigerate.
Monday, June 27, 2011
Healthy Blueberry Malt
My next-door neighbor Hannah had her wisdom teeth pulled-all four at one time. She is brave. Or a glutton for punishment. Not sure! I asked her if she would like to try one of my blueberry malts. She mumbled yes so I got the dusty blender out. Blueberries are inexpensive right now so I've been purchasing fresh and then flash freezing them. I think I learned the technique from Alton Brown. I used to put the fresh blueberries in a bag and throw them in the freezer. I would end up with a big blue rock of frozen blueberries. Now I wash them, dry them, pick the stems off, throw the mushy and fuzzy blueberries out, put them on a cookie sheet, and throw them in the freezer (It is not as labor intensive as it sounds-really!) When frozen, I measure them and put them into baggies labeled with the date and amount of blueberries inside. Then they are ready to be blended frozen with low-fat vanilla ice cream or vanilla frozen yogurt, vanilla soy milk or regular milk, and malt powder into a delicious, mostly guilt free, thirst quenching, sweet-tooth satisfying malt. The picture below was taken after the malt had been sitting out for a while-and then mostly slurped up. I'm still not in the habit of thinking about taking pictures of everything I make before I eat it!
![]()
Here is the simple recipe:
1 cup frozen blueberries (or four chunks frozen banana, or five big frozen strawberries)
2 packed cups of frozen low-fat vanilla yogurt or low-fat vanilla ice cream.
1/2 cup malt powder ( I LOVE malt flavor.)
3/4 cup vanilla soy milk or regular milk (you may need a little more if the malt is too thick to blend).
Put it all in the blender in the order listed above and blend until smooth. Sometimes I need to stir it up a little bit during blending. Remember to turn the blender off when doing this!

I love the purple color and bits of blueberry.
Here is the simple recipe:
1 cup frozen blueberries (or four chunks frozen banana, or five big frozen strawberries)
2 packed cups of frozen low-fat vanilla yogurt or low-fat vanilla ice cream.
1/2 cup malt powder ( I LOVE malt flavor.)
3/4 cup vanilla soy milk or regular milk (you may need a little more if the malt is too thick to blend).
Put it all in the blender in the order listed above and blend until smooth. Sometimes I need to stir it up a little bit during blending. Remember to turn the blender off when doing this!
Wednesday, June 22, 2011
Almost one bowl brownies and Brownie cutting tip!
I was searching for an easy brownie to make with cocoa. I've been stuck on banana brownies with melted chocolate for so long, I thought it was time for change. I contacted Anna at Cookie Madness and she suggested the one-bowl brownies. I made them, but, as usual, with a few changes because A.: I'm lazy and B.: I've got other ingredients to use up! I added chocolate chips, but next time I think I would add nuts instead since the chocolate chips seemed like overkill to me-if there is such a thing as chocolate overkill! Anyways, I would say they came out perfect with the exception that they didn't have the shiny crinkly crust I want :( That crust is still a mystery to me. There are many theories. Whenever I make banana brownies and use semi sweet chocolate I get the shiny, crackly crust. When I use bittersweet chocolate, I get more of a cake looking crust. I thought maybe it had something to do with the sugar to fat ratio-the more heavy on the sugar and less heavy on the fat, the better chance for a crackly shiny crust. Cocoa brownies disproved that theory since there is a lot less fat in them and I didn't get the shiny crust. Boxed brownies have the "crust". It can't be the melting theory because I melted the semi-sweet and the bitter sweet the same way. It can't be the stirring theory because I stirred them the same way. Let me know if you have a theory!
Brownie cutting tip: Use a plastic knife. Works every time and brownies avoid sticking to it like it is the plague (not sure what a brownie considers a plague-maybe those fake baking chips?, but you get the idea!) Sometimes the knives break so have a few on hand!
![]()
![]()
Here is my modified version:
Almost One Bowl Brownies
Modified to fit an 8 x 8 baking pan.
8 tablespoons salted butter (1 stick)
1/2 cup +1/3 cup firmly packed light brown sugar
2 large eggs
1 teaspoon vanilla extract
2/3 cup all-purpose flour (used 1/3 cup all-purpose and 1/3 cup whole wheat pastry flour to make them a bit more healthy!)
1/4 teaspoon baking powder
1/8 teaspoon salt
1/4 cup +1/8 cup unsweetened cocoa powder (I used Hershey's)
1/2 cup semi sweet chocolate chips (I love Ghirardelli)
1/2 cup lightly toasted nuts of your choice (my favorites are pecans.)
Preheat oven to 350°. Lightly grease the bottom only of an 8 x 8 metal pan. I use PAM spray.
In a medium bowl whisk together the flour, baking powder, salt, and cocoa powder. Set-aside.
Melt butter in a microwave safe medium large mixing bowl. Whisk in the sugar, eggs, and vanilla.
When that mixture is smooth, whisk in the dry ingredients. Then stir in chocolate chips and nuts.
Bake on center rack of your oven for approximately 22 to 25 minutes or until a tooth pick inserted in the middle comes out with moist crumbs. Cool completely before slicing. I use a plastic knife which works perfectly every time! Bon appétit!
Brownie cutting tip: Use a plastic knife. Works every time and brownies avoid sticking to it like it is the plague (not sure what a brownie considers a plague-maybe those fake baking chips?, but you get the idea!) Sometimes the knives break so have a few on hand!

My "flashy" picture.

My not so flashy picture.
Here is my modified version:
Almost One Bowl Brownies
Modified to fit an 8 x 8 baking pan.
8 tablespoons salted butter (1 stick)
1/2 cup +1/3 cup firmly packed light brown sugar
2 large eggs
1 teaspoon vanilla extract
2/3 cup all-purpose flour (used 1/3 cup all-purpose and 1/3 cup whole wheat pastry flour to make them a bit more healthy!)
1/4 teaspoon baking powder
1/8 teaspoon salt
1/4 cup +1/8 cup unsweetened cocoa powder (I used Hershey's)
1/2 cup semi sweet chocolate chips (I love Ghirardelli)
1/2 cup lightly toasted nuts of your choice (my favorites are pecans.)
Preheat oven to 350°. Lightly grease the bottom only of an 8 x 8 metal pan. I use PAM spray.
In a medium bowl whisk together the flour, baking powder, salt, and cocoa powder. Set-aside.
Melt butter in a microwave safe medium large mixing bowl. Whisk in the sugar, eggs, and vanilla.
When that mixture is smooth, whisk in the dry ingredients. Then stir in chocolate chips and nuts.
Bake on center rack of your oven for approximately 22 to 25 minutes or until a tooth pick inserted in the middle comes out with moist crumbs. Cool completely before slicing. I use a plastic knife which works perfectly every time! Bon appétit!
Sunday, June 12, 2011
Toasted Banana Bread slices!
I was in the mood for toast this morning, but I didn't have any bread. Then I realized that wasn't completely true-I had delicious banana bread made for my retirement pot luck by a coworker's wife. I wondered what a slice of banana bread would taste like toasted and slathered with butter. I found out. I may have discovered banana bread gold! The edges were crispy from the high sugar content. The rest of the slice was a little bit crispy on the outside and moist on the inside. With the butter slathered on, need I say more?
There may be some of you out there who have tried this. It may be old news to you. It was a new banana bread frontier to me! If you haven't tried it, I highly recommend it! Directions:
Slice a piece of banana bread into at least a 1/2 inch thick piece and pop it in the toaster. To remove it, unplug the toaster and take a couple of knives to lift it out.
There may be some of you out there who have tried this. It may be old news to you. It was a new banana bread frontier to me! If you haven't tried it, I highly recommend it! Directions:
Slice a piece of banana bread into at least a 1/2 inch thick piece and pop it in the toaster. To remove it, unplug the toaster and take a couple of knives to lift it out.
 |
| Better Than Lots of Things - Banana Bread Toast |
Friday, June 10, 2011
Rhubarb Crisp Crunch Time!
I've got so much rhubarb I don't know what to do with it! I know you can make sauces out of it, crisps out of it, pies out of it, chop it up and freeze it, or eat it raw dipped in sugar, but I'm basically lazy. Thank goodness I have a husband who likes rhubarb sauce on ice cream. He goes out and pulls the stocks, chops them, and voilà! All I have to do is cook them up or bake them up! My neighbor Lynda brought this wonderful rhubarb crunch over to my house last summer. It was the best rhubarb crunch or crisp I've ever tasted. She found the recipe on Allrecipes.com . I noticed many reviewers changed the recipe. Not being one to make anything exactly as the recipe states (excluding bread-never mess with that!) I made some changes too. I can't understand how the original recipe called for only 3 cups of rhubarb for a 9 x 13 pan! If you make it I bet people will tell you it's the best they've ever tasted! They will probably mean it too!!!


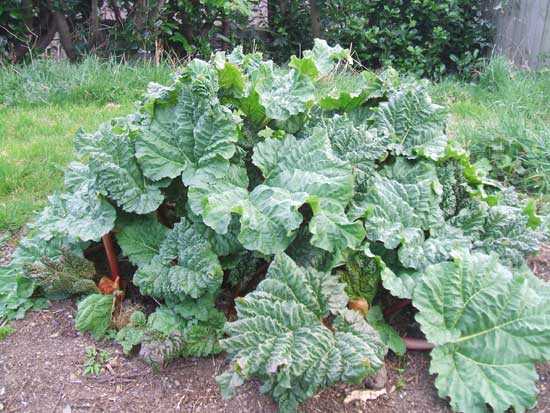
I've got five of these plants!

I stole this picture off of the web-I made this for a party and forgot to bring my camera.
The recipe is simple and delicious!
You can see the reviews of the original recipe here Rhubarb Crunch
Here is my version:
Rhubarb portion:
6 cups of rhubarb (about 12 medium to large stalks)
1 3/4 cup white sugar
7 generous tablespoons all-purpose flour
Topping:
1 cup packed light brown sugar
1 cup quick cooking oats
1 1/2 cups all-purpose flour
1/4 generous teaspoon salt
1 teaspoon cinnamon
1/2 cup lightly toasted pecans
3/4 cup (1.5 sticks) salted butter softened, but not melted.
Directions:
Metal pan: Preheat oven to ***375 degrees F
(190 degrees C).
Glass pan: Preheat oven to 350 degrees.
Lightly grease a 9x13 inch metal or glass baking
dish.
In a large mixing bowl combine 8 cups rhubarb, 1
¾ cup white sugar, and 7 tablespoons flour. Stir well and spread evenly into
baking dish with a little more towards the edges. Set aside.
In a large mixing bowl combine 1 cup packed
light brown sugar, 1 cup oats, 1/4 generous teaspoon salt, 1 teaspoon cinnamon and 1.5
cups flour. Stir well then cut in ¾ cups butter until mixture is crumbly. Mix
in ½ cup lightly toasted nuts. Sprinkle mixture over
rhubarb layer.
Bake 40 – 50 minutes or until bubbly around the edges.
In my glass pan it was done at 45 min on 350
You can leave this on your counter for a couple of days with no risk of spoiling. Be sure to cover it though or critters may beat you to it!
You can leave this on your counter for a couple of days with no risk of spoiling. Be sure to cover it though or critters may beat you to it!
Sunday, May 15, 2011
Sea Salt Chocolate Chip Pecan cookies, Spring is here, and cat foot bite!!!
Last night, Saturday, May 14 at about 11:00 p.m. I realized it was National Chocolate Chip Cookie day on Sunday, May 15, 2011. I was scanning Cookie Madness and other sites for CCC recipes
(CCC=chocolate chip cookies for those unfamiliar with food blog acronyms) and decided to make some batter at about 12:30 a.m. I was experiencing my own cookie madness! I needed them to be baked and travel-ready on Sunday morning so I could have my brother's family try them. I had a "happy accident" that turned into sea salt sprinkled cookies. I added a little extra flour and refrigerated the dough to prevent what so many others have complained about: flat, greasy cookies.
I think they are the best I've made so far...you be the judge!!!
Off the subject of cookies, I included some pictures taken today. I was thrilled by what a beautiful day it was here in Minnesota. Yesterday the temps were in the 40s, it was windy, and rainy-I was freezing all day. Below you will see the contrast!!!!


The recipe (for a small batch of two dozen cookies): Loosely adapted from the Cookie Madness site, Ghirardelli bag, and my own spin...
Ingredients:
1 1/4 cups flour (I used 1 cup all-purpose and a quarter cup of whole wheat pastry flour)
1/2 teaspoon baking soda
1/4 teaspoon salt (or a 1/2 teaspoon salt if you are not going to sprinkle with sea salt)
1/2 cup (1 stick) softened salted butter (I usually put my cold stick of butter in the microwave for 25 seconds at 50% power)
1/4 cup +1/8 cup white granulated sugar
1/4 cup +1/8 cup packed brown sugar
1 teaspoon vanilla
1/4 teaspoon almond extract
1 large egg (I've heard it's good to have it at room temp when baking. Not sure why...)
Generous 1 1/4 cup semi-sweet chocolate chips
1/2 cup lightly toasted pecans or walnuts
Sea Salt or kosher salt
Directions:
In a small bowl mix the flours, baking soda, and salt. Set aside.
In a medium-size mixing bowl add the sugars and the butter. Beat with an electric mixer for about 4 to 5 minutes until light and a bit fluffy.
Add the egg, vanilla, and almond extract. Beat on medium speed until incorporated, or for about a minute or two.
Slowly incorporate the dry ingredients mixing on low. Then pour in the chocolate chips and nuts. Mix on low or by hand until evenly distributed in the batter. If you don't want to refrigerate them, you can go directly to the Baking step (I highly recommend refrigerating them.)
Press the dough into the bottom of the bowl and cover tightly with plastic wrap.
**Refrigerate at least four hours-this will help turn the cookies from flat to voluptuous!
Baking:
Preheat oven to 375°
Line 2 cookie sheets with parchment paper-I've tried this with and without parchment paper. It is easy to remove the cookies from the parchment paper or directly from the cookie sheet, but cleanup is easier using parchment paper. No need to grease the paper or cookie sheet.
Scoop stiff dough out with an ice cream scoop or tablespoon. I rolled dough in my hands quickly into golf ball size blobs and set them approximately 2 inches apart on the cookie sheet.
Put a tiny pinch of sea salt on top of each cookie.
Bake anywhere from 9 to 12 minutes depending on how long your dough has been refrigerated and how large your cookies are. Remove tray from oven and let cookies set a spell- 2 minutes. Then remove to cooling racks
I like my CCC browned around the edges and a little bit lighter in the middle. I left my dough in the refrigerator overnight, made golf ball size blobs, and baked them about 10 minutes.

(CCC=chocolate chip cookies for those unfamiliar with food blog acronyms) and decided to make some batter at about 12:30 a.m. I was experiencing my own cookie madness! I needed them to be baked and travel-ready on Sunday morning so I could have my brother's family try them. I had a "happy accident" that turned into sea salt sprinkled cookies. I added a little extra flour and refrigerated the dough to prevent what so many others have complained about: flat, greasy cookies.
I think they are the best I've made so far...you be the judge!!!
Off the subject of cookies, I included some pictures taken today. I was thrilled by what a beautiful day it was here in Minnesota. Yesterday the temps were in the 40s, it was windy, and rainy-I was freezing all day. Below you will see the contrast!!!!
 |
| Tulips and Daffodils |

What CCC looked like after just going into the oven.

Cooled and almost ready to eat off my thrift-store plate which I love!

Now ready to eat with a delicious glass of cold milk.
Recipe follows Spring/Oriole pictures


5 Orioles in this pic-a couple sitting on my viburnums. Grape jelly is the draw.
My talented husband made the cup holder.

Rescued cat Bozo chewing his big foot...now on to the recipe!
The recipe (for a small batch of two dozen cookies): Loosely adapted from the Cookie Madness site, Ghirardelli bag, and my own spin...
Ingredients:
1 1/4 cups flour (I used 1 cup all-purpose and a quarter cup of whole wheat pastry flour)
1/2 teaspoon baking soda
1/4 teaspoon salt (or a 1/2 teaspoon salt if you are not going to sprinkle with sea salt)
1/2 cup (1 stick) softened salted butter (I usually put my cold stick of butter in the microwave for 25 seconds at 50% power)
1/4 cup +1/8 cup white granulated sugar
1/4 cup +1/8 cup packed brown sugar
1 teaspoon vanilla
1/4 teaspoon almond extract
1 large egg (I've heard it's good to have it at room temp when baking. Not sure why...)
Generous 1 1/4 cup semi-sweet chocolate chips
1/2 cup lightly toasted pecans or walnuts
Sea Salt or kosher salt
Directions:
In a small bowl mix the flours, baking soda, and salt. Set aside.
In a medium-size mixing bowl add the sugars and the butter. Beat with an electric mixer for about 4 to 5 minutes until light and a bit fluffy.
Add the egg, vanilla, and almond extract. Beat on medium speed until incorporated, or for about a minute or two.
Slowly incorporate the dry ingredients mixing on low. Then pour in the chocolate chips and nuts. Mix on low or by hand until evenly distributed in the batter. If you don't want to refrigerate them, you can go directly to the Baking step (I highly recommend refrigerating them.)
Press the dough into the bottom of the bowl and cover tightly with plastic wrap.
**Refrigerate at least four hours-this will help turn the cookies from flat to voluptuous!
Baking:
Preheat oven to 375°
Line 2 cookie sheets with parchment paper-I've tried this with and without parchment paper. It is easy to remove the cookies from the parchment paper or directly from the cookie sheet, but cleanup is easier using parchment paper. No need to grease the paper or cookie sheet.
Scoop stiff dough out with an ice cream scoop or tablespoon. I rolled dough in my hands quickly into golf ball size blobs and set them approximately 2 inches apart on the cookie sheet.
Put a tiny pinch of sea salt on top of each cookie.
Bake anywhere from 9 to 12 minutes depending on how long your dough has been refrigerated and how large your cookies are. Remove tray from oven and let cookies set a spell- 2 minutes. Then remove to cooling racks
I like my CCC browned around the edges and a little bit lighter in the middle. I left my dough in the refrigerator overnight, made golf ball size blobs, and baked them about 10 minutes.
Enjoy!

Subscribe to:
Posts (Atom)