State Fair

State Fair
State Fair Ribbons

Monday, October 7, 2013

KAF Flourless Fudge Cookies

OMG.  Who knew gluten-free deep, dark chocolate cookies could be quick and easy to make.  If you want a perfect dark chocolate, gluten-free, easy cookie to mix up, look no further. Most people don't have a clue there is no flour in this recipe. Just look at the photo below. They taste as good as they look!


These are so easy to make your five-year old could do it!
Here is my adaptation of King Arthur Flour's Flourless Fudge Cookie

Yeild:  about 24 cookies

Ingredients:

  • 2 cups confectioners' sugar (powdered sugar)
  • 1/4 teaspoon salt
  • 1/2 teaspoon decaf coffee crystals (smashed fine with a spoon), optional but good
  • **1 cup cocoa powder, Dutch-process (or make your own) 
  • 3 large egg whites ( or 4 if your batter is stiff)
  • 1/2 teaspoon gluten-free extract (I would use orange, but you could use almond,  vanilla, or whatever you like)
  • 1 cup semi sweet chocolate chips
  • 1 cup toasted nuts

Directions:
  1. Have egg whites at room temperature
  2. Preheat oven to 350°.  Spray two large cookie sheets with nonstick spray or line with parchment paper and spray that with nonstick spray **(Make sure it is not the baking spray because that has flour in it).
  3. In a medium-size bowl combine dry ingredients with a wire whisk until mixed well. Set-aside.
  4. In a small bowl using a fork lightly beat the egg whites for about 10 seconds.  Mix in extracts.
  5. Pour the egg whites into the dry ingredients  and mix carefully until fully combined using a spatula to mix up from the bottom.  (Batter is supposed to be thin like cake batter, but mine never is).  Then mix in chocolate chips and toasted nuts.
  6. Drop by tablespoon full onto cookie sheets leaving at least 1 inch space between cookies ( if you don't add chocolate chips or nuts they will spread more so give them at least 2 inches space.)
  7. Bake for eight or nine minutes. Remove from oven and either let cool on the tray or wait a few minutes and then pick them up and put them on cookie cooling racks. 
  8. Store covered on your counter.  Not sure how long they last, but it has not been an issue here.    
**Notes:  
I used a suggestion I read on the Internet on how to turn natural processed cocoa like Hershey's into Dutch processed cocoa.  Dutch processed cocoa has less acid and is more expensive.   For every 3 tablespoons of Hershey's natural cocoa you mix in 1/8 of a teaspoon of baking soda which is an alkaline. So for a cup of Hershey's natural cocoa (16 tablespoons) you mix in approximately 5/8 of a teaspoon. I think I may try using the Dutch cocoa next time, but these came out good. I just want to see if there is a difference.

Sunday, October 6, 2013

Delicious Gluten-Free Orange Chocolate Chip Meringue Cookies AKA Forgotten Kisses

I have been looking for gluten-free cookies recipes and recently came upon a post from Anna at Cookie Madness for meringue cookies.  Her recipe opened up a whole new world of meringue cookies for me.  Forgotten Kisses refers to leaving the cookies in the oven from a few hours to overnight to crisp up.  I altered Anna's recipe a bit, but as is they were great too!!!  
I am an orange and chocolate fan so I added some orange extract to the whipped egg whites. 
You can find her recipe at the link above.
Gluten free, less fat, and some egg-white protein too!  What's not to like?


Chocolate-chip pecan meringue cookies

My adapted recipe is here:

Ingredients
  • 3 large egg whites
  • 1 cup sifted confectioners’ sugar (don't skimp)
  • 1/4 teaspoon cream of tartar 
  • 1/2 teaspoon orange extract
  • 1 cup pecans or walnuts, toasted and chopped
  • 3/4 cup semi-sweet chocolate chips.
Instructions
  1. Preheat oven to 275 degrees. Line two baking sheets with parchment paper.  ( I made the cookies big and only needed one sheet. See tips below.) 
  2. In a mixing bowl, beat the egg whites with an electric mixer until just foamy.  Add cream of tartar.  Continue beating until you have soft peaks.  Beat in the sugar a few tablespoons at a time. Continue beating until stiff, shiny peaks form (mine didn't get completely stiff. It looked like stiffer shiny marshmallow cream). 
  3. To make sure the sugar has disolved, take a bit of the whites and rub between your fingers.  If it is silky smooth, you should be close to done. Then beat in the extract. Carefully fold in the pecans and chocolate chips.
  4. Using a teaspoon, drop 12 mounds of cookie dough onto each baking sheet. Set one sheet on the middle rack and one on the lower rack and bake for 15 minutes.
  5. After 15 minutes switch the baking sheets so the sheet on the bottom is now on the top and the sheet on top is not on the bottom. Bake for another 15 minutes at 275 degrees.
  6. Turn off oven and let the cookies sit in the closed oven for about two hours or overnight. 


Tips:  
  1. Use egg whites that are at least as warm as room temperature.  I take mine out and put them on top of the oven while it is preheating.
  2. My stand mixer would not beat this small amount of whites so I needed to use my hand mixer.  
  3. Make sure you use at least a medium sized bowl because the whites will increase in volume as you beat them.
  4. Take a dab of the whipped egg whites and put some under each corner of the parchment paper to work as "glue" so it doesn't slip.
  5. Bigger cookies are a bit crumbly, but I think they are impressive-looking.  Smaller "one bite" sized cookies are neater.  
  6. I made larger cookies and got 13.  I baked them 45 minutes at 275 degrees.  
  7. You can try using mini chocolate chips if you make smaller cookies.
  8. Don't make them on a humid day unless you've got the AC running. 
  9. Don't eat too many.  They are suprisingly good!!  


Thursday, October 3, 2013

What To Do With Those Frozen Summer Berries??

If you are like me, you found bargains on fresh blueberries and strawberries over the Summer.  If you are like me, you purchased too many and stuck them in your freezer.  Unlike me, you probably are using them in healthy snacks or quick breads.  
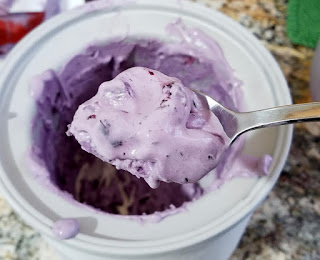
I decided to use them in ice cream.  No complaints from the husband, nieces, or nephews!  I made blueberry custard ice cream and strawberry custard ice cream.
I used the same recipe for both, but I used bits and pieces from 3 different blogs.  The recipes are a combination of Rich and Creamy Vanilla Ice Cream from Cookie Madness, Blueberry Ice Cream from Fine Cooking, and Strawberry Ice Cream from Joy of Baking.  

Tips: 

  • You can make the blueberry and strawberry sauces a few days in advance and refrigerate. 
  • Put a medium sized covered empty bowl in the freezer ahead of time so it will be cold when you spoon the freshly churned ice cream into it. 
  • If you are making an ice cream pie, pour the churned soft ice cream directly into the pie crust.  Don't freeze it hard, then soften it to put in the crust and re-freeze. If you do, the texture becomes icy.  At least it did for me.
  • Make scrambled egg-whites or an omelet with the leftover egg whites.  I add about a 1/4 cup of milk, some salt, onion, and garlic powder. I also add any leftover cut up meat or veggies. Beat it up, fry it in some olive oil, and presto!  OR Microwave it in a covered bowl with a vent, even easier!! You have a healthy meal to be followed by ice cream.


Blueberry Sauce:
  • 12 oz. (2+ cups) fresh or frozen blueberries (I fill the 2-cup measuring cup to the top in order to get 3/4 cup of liquid in the end)
  • 1/4 cup light corn syrup (keeps churned ice creams creamier than regular sugar)
  • 1/2 teaspoon lemon juice (fresh or bottled)
  • Directions:
  • In a 2-quart saucepan, combine the berries, corn syrup, and lemon juice. Set the pan over low heat and mash the berries well with a potato masher or the back of a large fork.  Increase the heat to medium low and bring the mixture to a simmer. Simmer for 10 minutes or until it gets thicker, stirring occasionally.  Use an immersion blender to blend the sauce while it is in the pan.  If you don't have one, use a regular blender or just mash real well.  STRAIN WELL to get about 3/4 cup of liquid.  Refrigerate until cold.  
Strawberry Sauce:   No photo :(  You will need to use your imagination!
10 oz of frozen or fresh strawberries
1/4 cup light corn syrup
1/2 teaspoon lemon juice

Directions:
In a 2-quart saucepan, combine the berries, corn syrup, and lemon juice. Set the pan over low heat and mash the berries well with a potato masher or the back of a large fork. Increase the heat to medium low and bring the mixture to a simmer. Simmer for 10 minutes or until it gets thicker, stirring occasionally.  Use an immersion blender to blend the sauce while it is in the pan.  If you don't have one, use a regular blender or just mash real well.  STRAIN. Refrigerate until cold.


Blueberry

Strawberry

Drumroll...the ice cream base:
Makes about 1 1/2 quarts
3/4 cup granulated sugar or 1/2 cup sugar and 1/4 cup light corn syrup
1/8 teaspoon salt
6 large egg yolks
1.5 cups 1/2 and 1/2
1  cup heavy whipping cream (not whipped!!)
1/2 t vanilla or other flavoring optional. 


  1. Set a large bowl on a towel on the counter.  Pour the cream into it.  Put a hand held strainer on top of it.  Set aside. 
  2. In a medium sized mixing bowl, beat or whisk the sugars and salt into the egg yolks until thickened a bit.  Set aside.
  3. Pour half-and-half into a 2 quart sized sauce pan and bring to a simmer (bubbling a bit), not a full boil.  
  4. Slowly drizzle and constantly whisk the hot half-and-half into the egg mixture. If you pour too fast, you will get scrambled eggs. Pour the egg mixture back into the sauce pan and stir constantly with a heat proof spatula (making sure you stir from the bottom) until the custard thickens slightly and looks like thick eggnog. Be careful not to let the mixture boil or the eggs will scramble. Remove from the heat and pour the hot custard through the strainer into the bowl with cream. Press the liquid through the strainer if it is too thick. Stir just until combined.  Partially cover (or condensation will drip water into your mix) and let cool to room temp. Stir in any extracts. Wipe off condensation from bowl cover, replace cover tightly, and refrigerate until cold or overnight.  
  5. Place an empty medium sized covered bowl in the freezer to put the ice cream into once it is churned.
  6. For Strawberry or Blueberry Ice Cream. Right before you are ready to churn, stir 3/4 of a cup of the chilled strawberry or blueberry sauce into the chilled custard, then freeze in your ice cream machine according to the manufacturer’s instructions. When finished, the ice cream will have a soft-serve texture.  If you want it harder, transfer it to the bowl you had in the freezer and freeze at least 2 hours.