State Fair

State Fair
State Fair Ribbons

Monday, March 25, 2013

Passover Sweet and Sour Meatballs

 It is no secret Passover is traditionally NOT a good time to begin a health-food diet.  I usually post baked goods, but today I'm posting a Sweet and Sour Meatball recipe that is about as good as dessert.  To me, anyway!   Since the recipe uses brown sugar and apricot preserves, it qualifies as dessert-like.   I know everyone who celebrates Passover has probably made theirs already and you probably have an old standby that your relatives made, but these are easy, delicious, and worth a try. No one could find my grandmother's recipe.  I knew she used a citrus soda pop and brown sugar, but I didn't remember any of the other details.   It took me years of trying out less successful recipes (my family can confirm) to finally get everyone's favorite.   The secret is lots of eggs and onions.   I also cook the meatballs in the sauce.  I used to bake the meatballs and then add them to the sauce later because it was easier to skim off the hamburger fat. I don't eat these meatballs often and they taste much better cooked in the sauce  so it is a guilty pleasure I'm not going to mess with.


Here is the recipe...

Approximate assembly time 30 minutes
Approximate cooking time:  60 minutes

For the utensils you will need:
  • 8 quart Stock pot
  • large mixing bowl
  • cookie sheet

For the meatball mixture you will need:
  • 3 pounds of lean ground beef-I use about 85% lean.  This time I used ground beef, but I have also used a mixture of 2 pounds ground beef and 1 pound ground turkey.
  • 6 large eggs
  • 1 1/2 cups matzoh meal
  • 1 medium finely chopped onion
  • 1/2 cup tomato ketchup
  • 2 teaspoons salt
For the sauce you will need:
  • 12 ounce jar of apricot preserves (or any other fruit preserve)
  • 2 small cans (6 oz each) of tomato paste
  • 15 ounce can of tomato sauce
  • 1 can (10 3/4 oz) of tomato soup +1 can of water
  • 26 ounce can of Hunt's plain spaghetti sauce (or any other brand you like)
  • 1 cup brown sugar firmly packed
  • 2 medium finely chopped onions
  • 3 or 4 tablespoons of lemon juice
  • 2 teaspoons salt
Directions:
Make sauce first. Put all of the sauce ingredients into an 8 quart pan.  Heat  and stir sauce on medium until it begins to boil.   Stir occasionally so the bottom doesn't burn.  While the sauce is heating up, make the meatballs.
You will need a large bowl.  Add six eggs and beat with a fork or eggbeater just until they are blended. Add the chopped onions, ketchup, salt, matzoh meal, and stir until well combined. Add the hamburger and mix until combined well. I use rubber gloves for this part.   
Roll meatballs so they are about an inch and a half in diameter.  Set the meatballs on a cookie sheet as you roll them.   When you are finished rolling meatballs, drop them one by one into the boiling sauce.   REDUCE TEMPERATURE TO MEDIUM LOW.  
Cook for 30 minutes gently stirring a couple of times from the bottom up. At the end of the first 30 minutes stir so that meatballs on the bottom are redistributed to the top. Cook for another 30 minutes.

Notes:  The meatballs will not all be covered by sauce at first.  I sometimes spoon a little sauce from the side up and over the top meatballs trying hard not to break any of them. As the sauce and meatballs cook down,  they will sink.
If you decide to bake the meatballs and then add them to the sauce-or just eat them plain, reduce the salt in them by 1/2 teaspoon.   

Saturday, March 16, 2013

Coconut Cupcakes With Cocoa Buttercream Frosting

If you are a Mounds bar fan, you will love these cupcakes!  I was browsing my favorite blogs and found White Mountain Coconut Cupcakes on Cookie Madness.  They looked fairly simple to make and I love coconut so I thought I would give them a try.   I didn't have cake flour so I improvised with the standard substitution of 2 tablespoons of cornstarch to replace 2 tablespoons all-purpose flour. DON'T DO IT!!!  The weird thing is the cupcakes ended up tasting like corn muffins.  I like corn muffins, but not so sure I liked them with the chocolate frosting though....So, I decided to cave in and invest in cake flour.  Glad I did.   These cupcakes were tender and had a faint flavor of coconut. I did improvise on the cupcake and made up my own chocolate buttercream frosting (most of them are too sweet for me) by combining a few different recipes to come up with my favorite chocolate buttercream frosting.


You'll have to excuse the cupcake model-I'm not good at dressing and posing models.


Here is my slightly modified recipe:


  • 1 1/4 cups cake flour
  • 1 teaspoon baking powder
  • 1 stick (8 tablespoons)  salted butter at room temperature (add 1/4 teaspoon salt if using unsalted butter.)
  • 1 cup granulated sugar
  • 2 large eggs at room temperature
  • 1 teaspoon vanilla extract
  • 1/2 cup room temperature coconut milk (I used full fat, not reduced fat)
  • 1/2 cup sweetened shredded coconut, not toasted.

  • Chocolate Buttercream Frosting by Gloria:

  • 1 stick salted butter (8 tablespoons)
  • 2 cups powdered sugar
  • 1/2-3/4 cup regular unsweetened cocoa (not Dutch process)
  • 1/4 cup (approximately 1.5 ounces) semi sweet or bittersweet chocolate chips
  • 1/3 cup coconut milk or more if needed
  • 1 cup sweetened shredded coconut lightly toasted plus a 1/3 cup of un-toasted coconut**


  • Instructions for Cupcakes:
    Preheat oven to 350 degrees F. 
    Line 12 cupcake cups with paper liners.
    Mix the flour, baking powder and salt ( if using unsalted butter) in a bowl and set aside.
    In a medium sized mixing bowl beat the butter and sugar on medium speed for about five minutes. Add the eggs, one at a time, beating until each egg is incorporated. Add the vanilla and beat well.
    Beat in half the flour on lowest speed. When flour is blended, beat in the coconut milk. Beat until blended, then add the rest of the flour mixture and beat on lowest speed until smooth.  Stir in the 1/2 cup of shredded coconut.
    Fill each cupcake liner about 2/3 full and bake for about 22 minutes or until cupcakes bounce back when touched. Mine were done in about 21 minutes.   Frost as soon as they are room temperature.

    Make the frosting:
    Melt chocolate in a microwave proof measuring cup for about 30 seconds on high. Stir until completely melted. Set-aside.
    Beat room temperature butter with an electric mixer for a few minutes or until light and fluffy. In a separate bowl mix 2 cups of powdered sugar with cocoa until well combined.  Blend sugar mixture alternately with coconut milk beating well after each addition. Add melted chocolate and beat until smooth.
    Immediately after frosting cupcakes sprinkle toasted shredded coconut on top. Otherwise they won't stick to the frosting after it sets up.  
    Frosting tip learned from a video posted on Cookie Madness:
    cover the whole top of the cupcake with a layer of frosting so you don't see any of the cake.  This helps prevent the cupcake from drying out.  

    **  Toast coconut by spreading it out on a cookie sheet lined with foil. Heat the oven to 350 and bake for about three minutes. Remove from oven and stir. You want less than half of the coconut to be brown.  When cool, I mix in about a 1/3 cup of un-toasted shredded coconut.

    Tuesday, February 26, 2013

    Hummingbird Carrot Cake, Lying Tooth-picks, and Accidental Granola


    I had the good fortune to eat the Shrimp Shack in Fort Myers this winter. 
    The fish was good, but the hush puppies (best I've had) and hummingbird cake were OOTW!   I wanted the recipe for the cake BAD!!!!
    I called the Shrimp Shack and found out it would cost about $50 to ship a whole cake to Minnesota.  Hmm...I did consider it. I liked it that much.  Well, some sense kicked in (my bank statement actually) so I decided to make one myself.  

    My go-to site is Cookie Madness to see what Anna has in her recipe box. Sure enough, she posted a hummingbird cake recipe.  

    I baked mine in a 9 x 13 pan.  I did not let it bake long enough. At 42 minutes I took it out-the toothpick was clean.  Did you know toothpicks can lie?  The whole center caved in a bit after it cooled. I cut just the outside of the cake all the way around and ended up with 3 bread loaf pan shaped pieces.  


    And what did I do with the underdone center?  Well, I made lemonade out of lemons.  I cut the raw-ish cake into bite-size pieces, threw them on a baking sheet, and let them dry out in a 300 degree oven for about 30 minutes-maybe longer ( I was not timing it exactly).  I stirred them a couple times. 
    They were crispy, tasty, a bit like granola since they had fruit and nuts in them, and I didn't waste all those delicious ingredients.  I can mix them in yogurt or cereal.  


    Yes, they look like hamburger or stuffing. Oh well.  They taste better than they look.

    Here is Anna's Hummingbird Cake turned into a carrot cake with a few of my changes:

    Ingredients: 
    3 cups all-purpose flour
    1 teaspoon baking soda
    1 teaspoon salt
    2 cups sugar
    1 teaspoon ground cinnamon
    3 large eggs, beaten
    1 cup vegetable oil

    1 (8-ounce) can crushed pineapple, undrained
    1.5 cup chopped toasted pecans --divided use!
    2 cups mashed bananas  (it took 4 or 5 medium to make 2 cups)
    1 cup shredded carrots   (I might add 1.5 cups next time)
    Cream Cheese Frosting-my adaptation of Anna's recipe below.

    Directions:
    Preheat oven to 350 degrees F. Spray (2) 9-inch round cake pans or a 9 x 13 pan with flour-added cooking spray or rub with shortening and dust with flour.
    Stir flour, soda, salt, sugar and cinnamon together in a large mixing bowl.  Set aside.  Add eggs, mashed bananas, and oil into another mixing bowl and mix well together by hand.  Then add that wet mix to the dry, stirring until dry ingredients are moistened. (Do not beat.) 
    Stir in pineapple and 1 cup pecans-**save the 1/2 cup for topping. 
    Pour batter into cake pans and bake for 25 to 30 minutes (in a 9 x 13 bake at least 45 minutes) or until a wooden pick inserted in center comes out clean. Cool in pans on wire racks 10 minutes; remove from pans, and cool completely on wire racks (I left the cake in my 9 x 13 pan).
    Spread Cream Cheese Frosting between layers and on top and sides of cake; sprinkle 1/2 cup chopped pecans on top. Store in refrigerator.
    16 servings

    Cream Cheese Frosting
    1 (8-ounce) package cream cheese, softened
    8 tablespoons (8 oz) salted butter at room temperature
    1.5 cups powdered sugar
    ½ teaspoon orange extract or one teaspoon vanilla. 
    (add 1/8 teaspoon salt if using unsalted butter)

    Beat cream cheese and butter at medium speed with an electric mixer until smooth. Gradually add powdered sugar, beating at low speed until light and fluffy. Beat in extract. 

    Monday, February 18, 2013

    No Need To Knead

    For some reason I was in the mood for baking bread the other day (Maybe because I live in Minnesota and the weather keeps me cooped up in the house.) 
    I discovered no-knead bread a while back when looking for a dairy free, egg free, iodized salt free recipe. I am not on the dairy free, egg free and iodized salt free diet now so I can have eggs, butter, milk, and regular salt. I also get to have the extra 10 pounds they put on me (of course it's not MY fault!)  I tweaked a no- knead whole wheat bread recipe I found on the King Arthur's website.  They claim it is so easy you can do it with one hand tied behind your back. Apparently the King Arthur official blogger for this bread did just that.  Another piece of information I found out is that King Arthur's baking hotline does work-even on the weekends there is a baker staff member waiting to answer your questions.  I was impressed!   So, without further delay, here is the recipe for KA no-knead whole wheat bread.


    For me it came out perfect! Sliced easily even when warm (yup, couldn't wait.) You need a stand mixer with the paddle attachment for this recipe. Changes I made because I didn't have orange juice or powdered milk or enough whole wheat flour: Substituted 1 cup bread flour for 1 one cup WW. Used 1 cup of 1% milk instead of 1 cup water. Used 1 teaspoon lemon juice and added milk to equal 1/4 cup. I mixed all dry ing. together in my KitchenAid mixing bowl. I mixed 3 T of molasses into the cold milk and then heated it to luke warm in the micro.

    Thursday, December 6, 2012

    ORANGE FLAVOURED CHOCOLATE CHIP COOKIE BARS

    Have you ever heard of a healthy chocolate chip cookie bar? No? Me either! I did however find a not-so-unhealthy chocolate chip cookie dough recipe on Cookie Madness.  It uses Kellogg's All Bran cereal.  I get a lot of inspiration from Anna's site.  Her recipes are tried and true. Then I mess around with them!  This recipe was forgiving with the changes I made and actually came out better than I expected! That is kind of why I made them into bars rather than spending extra time making cookies-I was not sure if my changes would ruin them or not. 


    In keeping with the  Kellogg's healthy All Bran theme, I substituted a half of a cup of whole wheat flour for one half of a cup of white flour.  Because I wanted to ensure they did not taste "healthy", I added a little more brown sugar and a little less white sugar.  (The bars are a little softer because of this. Next time I might go back to Anna's original recipe of 3/4 cups brown and 3/4 cups white sugar).  I also added 3/4 teaspoon of orange extract instead of vanilla hoping it would hide any "healthy" flavour! (It worked). I left the nuts out of my first go at this recipe. Because there is enough salt in this dough (they are not salty!), you don't need the nuts to cut the richness or the sweetness.  Plus, when I'm experimenting, I don't use the nuts because they are expensive! Anyway, these bars are delicious.  No one would have a clue there is anything healthy in them!   I had four open chocolate chip bags of various flavours. I mixed them all together and ended up with the 2 cups needed for this recipe.  I had fun squishing up the empty bags with frayed twist ties and throwing them away! See the link above for the original recipe. My changed recipe is below.


    Ingredients:
    • 1/2 cup Kellogg's All Bran cereal
    • 1/4 cup hot water
    • 1 stick salted butter softened, but not melted.
    • 1/4 cup vegetable oil or extra light olive oil
    • 1 cup golden brown sugar
    • 1/2 cup white sugar
    • 2 large eggs
    • 3/4 teaspoon orange extract
    • 2 cups all-purpose presifted flour
    • 1/2 cup whole wheat flour
    • 1 teaspoon baking soda
    • heaping 1/4 teaspoon salt
    • 2 cups chocolate chips (I used bittersweet, semi sweet, and white)
    • 1 cup chopped, toasted nuts of your choice (optional)

    Directions:
    1. Preheat oven to 325°. Lightly spray a 9 x 13" baking pan with non-stick spray or line with nonstick foil.
    2. Pour the All Bran into a small bowl and pour the hot water over it. Mix it up a little bit and let sit until it softens and turns mushy.
    3. In a medium-sized bowl combine flour, baking soda, and salt. Mix thoroughly.  Set aside.
    4. In a large mixing bowl cream the softened butter with the sugars and oil until well combined.   Add eggs and orange extract. Beat only until well combined.  
    5. Add the All Bran to the wet mixture and mix in until fully incorporated
    6. Add the dry ingredients to the wet ingredients and mix together on the lowest setting until JUST fully combined.  Stir in chocolate chips and nuts if you are using them.
    7. Pour into the prepared pan and pat down so the batter is evenly distributed.
    8. Bake on the middle rack of a 325° oven for approximately 28 minutes. Check at about 25 minutes as ovens vary.
    9. Let cool for about an hour.  Cut them into squares before the chips harden. You don't need to remove them from the pan yet, but cutting them after the chips harden is the mistake I made!!!


    Sunday, November 4, 2012

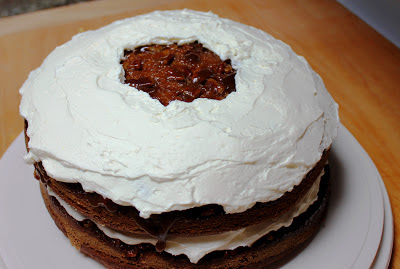
    5-Star Pumpkin Praline Torte

    It has been months since my last post. I can't believe time went by so fast! I did a lot of gardening, photography, and State Fair entry baking this summer.  Now to dust off my blog!
    I made my favorite Thanksgiving dessert today and thought I'd post it for you before TG.  I received the recipe from a work buddy years ago.  Then I altered it a bit.  No surprise there!  Then I saw it posted on the Taste of Home website.
    It has never, ever received a bad review from anyone (at least not in front of me!)
    People taste it and you see this look of happy amazement on their faces.  Not even crumbs are left on plates!!!  All reviewers rated it 5 out of 5 stars on Taste of Home.
    Here are a few photos.
    Just out of the oven


    Frosted


    Sliced and ready to eat


    You can see a caramel-coated pecan trying to fall out 
    of the middle.  

    You can get the recipe from the Taste of Home site, but here are my IMPORTANT TO ME changes:
    1.  I put a large cookie sheet on the bottom of the oven while it is preheating to catch the possible drips from the caramel.

    2.  I use real butter to coat and then lightly flour the pans.  Never had a cake stick.

    3.  I use only one 15 oz can of pumpkin.  That is about 1 1/2 cups, not two.  The
    change makes the cake lighter.

    4.  I use 1/4 teaspoon of orange extract in the batter instead of vanilla.

    5.  I only bake it for 30 min.  Check at 25 or so.  Less pumpkin causes it to bake up faster.

    6.   Only cool for 4 or 5 minutes in the pan MAX.  When removing the cakes from the pans after about 4 minutes of cooling, you will see caramel and nuts still in the pans. I put the pans back into the oven for about 2 min. and then scrape the remaining softened caramel out and drizzle over the cakes. (I save some to eat-it is amazingly delicious!!!)

    7.  I use 1/4 teaspoon of orange extract in the whipped cream topping.

    8.  Hints for the whipped cream:  put the bowl and beaters in the freezer about 15 min before you use them.  The colder the cream, the faster it whips up.

    9.  I use a product called Whip It  to stabilize the whipped cream so the cake can sit out for a few hours without the frosting melting.

    10.  Use a large, sharp knife to slice it.  As you can see in my photos, I didn't.

    I sure hope you try this cake!

    Sunday, June 10, 2012

    Easy, Fresh, Corny Salsa

    Every year I wait for a certain vendor to show up at our local farmer's market with his home made corny salsa. A small jar is over $7!  This year I couldn't wait and since I'm not working now, I thought I would try saving some money on salsa by making my own. I thought how hard could it be to find a good salsa recipe on line?  You can find everything online!  Guess what? It wasn't hard at all! I found two right off the bat! So, my recipe below is an adaptation of Tyler Florence's Salsa Fresca and Rob Barrett's Cooking For Dad's recipe on http://www.youtube.com/watch?v=J_evFB7RIKA   This guy is from Minnesota and so am I.  Many of us don't like fire-breathing dragon spicy food and he takes that into consideration with his recipe.


    I hope you enjoy my version!

    What you will need:
    Food processor-or get ready for lots of chopping.
    4 large or 5 small Roma tomatoes 
    1 green pepper-use half or the whole thing.  Cut into quarters.
    1/3 of a large peeled sweet onion
    1/2 jalapeno with seeds for spicy and without seeds for mild
    8-10 cilantro sprigs (important for flavor!-I use six because hubby is cilantro challenged) 
    2-3 peeled garlic cloves finely minced, or equivalent garlic powder
    1/2 cup fresh off the cob or frozen corn-not canned. If using frozen, do not defrost.
    1/2 teaspoon salt
    juice of one lime

    Directions:
    Wash all vegetables well.
    Slice tomatoes in half and with your finger scoop out the seeds and juice-throw seeds and juice out.  Throw tomatoes into the food processor.
    Slice the green pepper in half, scoop out the seeds, and throw them out with the stem. Quarter it and throw into the food processor.
    Slice the 1/3 of an onion in half and throw into the food processor.
    Slice the jalapeno and put in as much as you would like. I like mild salsa so I use ½ without seeds.
    Break cilantro sprigs in half and throw into the food processor.
    Add the remaining items to the food processor and pulse to get the desired consistency.
    This recipe makes about 3 cups of salsa-Enough for a couple bags of  Tostitos brand scoops!