State Fair

State Fair
State Fair Ribbons

Sunday, November 4, 2012

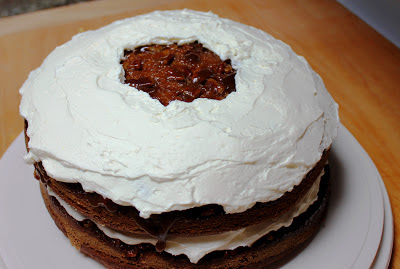
5-Star Pumpkin Praline Torte

It has been months since my last post. I can't believe time went by so fast! I did a lot of gardening, photography, and State Fair entry baking this summer.  Now to dust off my blog!
I made my favorite Thanksgiving dessert today and thought I'd post it for you before TG.  I received the recipe from a work buddy years ago.  Then I altered it a bit.  No surprise there!  Then I saw it posted on the Taste of Home website.
It has never, ever received a bad review from anyone (at least not in front of me!)
People taste it and you see this look of happy amazement on their faces.  Not even crumbs are left on plates!!!  All reviewers rated it 5 out of 5 stars on Taste of Home.
Here are a few photos.
Just out of the oven


Frosted


Sliced and ready to eat


You can see a caramel-coated pecan trying to fall out 
of the middle.  

You can get the recipe from the Taste of Home site, but here are my IMPORTANT TO ME changes:
1.  I put a large cookie sheet on the bottom of the oven while it is preheating to catch the possible drips from the caramel.

2.  I use real butter to coat and then lightly flour the pans.  Never had a cake stick.

3.  I use only one 15 oz can of pumpkin.  That is about 1 1/2 cups, not two.  The
change makes the cake lighter.

4.  I use 1/4 teaspoon of orange extract in the batter instead of vanilla.

5.  I only bake it for 30 min.  Check at 25 or so.  Less pumpkin causes it to bake up faster.

6.   Only cool for 4 or 5 minutes in the pan MAX.  When removing the cakes from the pans after about 4 minutes of cooling, you will see caramel and nuts still in the pans. I put the pans back into the oven for about 2 min. and then scrape the remaining softened caramel out and drizzle over the cakes. (I save some to eat-it is amazingly delicious!!!)

7.  I use 1/4 teaspoon of orange extract in the whipped cream topping.

8.  Hints for the whipped cream:  put the bowl and beaters in the freezer about 15 min before you use them.  The colder the cream, the faster it whips up.

9.  I use a product called Whip It  to stabilize the whipped cream so the cake can sit out for a few hours without the frosting melting.

10.  Use a large, sharp knife to slice it.  As you can see in my photos, I didn't.

I sure hope you try this cake!

Sunday, June 10, 2012

Easy, Fresh, Corny Salsa

Every year I wait for a certain vendor to show up at our local farmer's market with his home made corny salsa. A small jar is over $7!  This year I couldn't wait and since I'm not working now, I thought I would try saving some money on salsa by making my own. I thought how hard could it be to find a good salsa recipe on line?  You can find everything online!  Guess what? It wasn't hard at all! I found two right off the bat! So, my recipe below is an adaptation of Tyler Florence's Salsa Fresca and Rob Barrett's Cooking For Dad's recipe on http://www.youtube.com/watch?v=J_evFB7RIKA   This guy is from Minnesota and so am I.  Many of us don't like fire-breathing dragon spicy food and he takes that into consideration with his recipe.


I hope you enjoy my version!

What you will need:
Food processor-or get ready for lots of chopping.
4 large or 5 small Roma tomatoes 
1 green pepper-use half or the whole thing.  Cut into quarters.
1/3 of a large peeled sweet onion
1/2 jalapeno with seeds for spicy and without seeds for mild
8-10 cilantro sprigs (important for flavor!-I use six because hubby is cilantro challenged) 
2-3 peeled garlic cloves finely minced, or equivalent garlic powder
1/2 cup fresh off the cob or frozen corn-not canned. If using frozen, do not defrost.
1/2 teaspoon salt
juice of one lime

Directions:
Wash all vegetables well.
Slice tomatoes in half and with your finger scoop out the seeds and juice-throw seeds and juice out.  Throw tomatoes into the food processor.
Slice the green pepper in half, scoop out the seeds, and throw them out with the stem. Quarter it and throw into the food processor.
Slice the 1/3 of an onion in half and throw into the food processor.
Slice the jalapeno and put in as much as you would like. I like mild salsa so I use ½ without seeds.
Break cilantro sprigs in half and throw into the food processor.
Add the remaining items to the food processor and pulse to get the desired consistency.
This recipe makes about 3 cups of salsa-Enough for a couple bags of  Tostitos brand scoops!

Saturday, April 28, 2012

Veggie Delight Lasagna


The high today in Minnesota was 44° and that was before noon.  They told us we could possibly get snow!  Here I was ready to plant my annuals and instead I decided it was a good day for baking.  I once tasted my cousin Frank's vegetable lasagna.   I was in the mood for it and had friends coming for lunch who like veggies.  I remembered his was delicious. So I called him up. I was thrilled when he said he would give the recipe to me.  Then he just started dictating! I was scared.  When someone is not reading a written recipe, it makes me think they will forget something.  So I wrote while he spoke.  My post today is proof Frank has an excellent memory and an excellent recipe! I did change one or two things and added one or two things, but this recipe lends itself to improvisation.  Without further ado, here it is!

Cousin Frank's and Gloria's veggie lasagna

My friend's rescued puppy Bronte looking hungry for lasagna!!!


Ingredients:
One small box no boil lasagna noodles
About a ¼ cup olive or other vegetable oil
1 medium onion, chopped
2 cloves garlic, chopped
16 oz sliced small baby bella or crimini mushrooms for divided use
24 oz can Hunt's pasta sauce or your favorite pasta sauce
1 large bag rinsed and dried fresh spinach (the bags are about 7 ounces or so. )  *You may substitute frozen spinach that has been thawed and well drained.
1 cup shredded carrots ( my addition)
½ cup half and half creamer or cream (my addition)
32 oz container ricotta cheese
2 large eggs.
1 cup shredded parmesan cheese, divided use.
18 slices mozzarella cheese.

Getting Ready:
Preheat oven to 350
Spray a 9 x 13 pan with non-stick spray.  Set aside.
Spray the foil which will be covering the pan during baking or use non stick foil for covering the pan.  

For the sauce:
Pour the vegetable oil into a large saucepan.  Set heat to medium and sauté chopped onion until it is translucent (you can kind of begin to see through it). Then add 8 oz only of mushrooms and cook for a few minutes. Then add garlic and continue to cook for a few minutes so mushrooms lose their moisture and shrink.  When the mushrooms are cooked stir in the 32 ounce container of pasta sauce and pour in the bag of spinach.   Cook on medium low so the sauce just barely simmers uncovered for about 20 minutes.    Remove from heat and stir in 1/2 cup half and half or cream AND 1 cup shredded carrots.

For the ricotta layer:
Scoop out approximately 2/3 of a 32 ounce container of ricotta and put it into a medium-sized mixing bowl. Stir in eggs and 1/2 cup Parmesan cheese. Stir until well combined.

To assemble:
To the sprayed pan add about a quarter cup of sauce to spread over the bottom.   Use a little more if you need to.  Then add a layer of noodles.  Break to fit them if necessary. Spread some sauce over the noodles. Then place half of the remaining mushrooms evenly on top of the sauce.  Lay six slices of mozzarella cheese over them. Then spread half of the ricotta mixture over the mozzarella cheese.   Repeat. You will end up with the ricotta mixture on top.  Add six slices of mozzarella cheese on top of the ricotta and sprinkle top with one half cup Parmesan or to taste.  Bake covered for 30 minutes and uncovered for about 20 minutes or until cheese on top turns golden.  Note: you can assemble this lasagna and refrigerate it overnight. Then you will need to add 15 extra minutes or so to the "covered" baking time.

Monday, April 16, 2012

Good day for chicken soup!

It snowed a half a foot or more somewhere in MN to day, so today's recipe is chicken soup...
Chicken vegetable soup
You just can't predict soup weather in Minnesota! In March we had an 80° day. Today northern Minnesota got 8 inches of snow. We all go figure.
I was totally getting overdosed on brownies so I decided to make something healthy for a change.  This recipe has evolved over the years so now I call it completely my own (especially since I add an ingredient most people don't add, but it makes a delicious soup.)

Recipe:
3 1/2 or 4 pound cut up fryer
6 unpeeled carrots cut in thirds
2 onions peeled and quartered (I use yellow or white onions)
1 parsnip cut in thirds
1  yam  cut in thirds
2 stalks of celery  cut in quarters
4 cloves garlic  peeled, but not smashed
1.5 tablespoons salt

To add after soup is completely done: 
1 package peeled mini carrots
2 cups sliced celery
Broccoli florets..to taste. 

Directions:
Place chicken in an 8 quart stock pan.  Fill with cold water until chicken is just covered. Bring the water to a boil and then boil for about five minutes.  While waiting for the boil, wash the parsnip and carrots and celery and prepare the vegetables.  Set aside.  Skim the foam out of the pan as it boils.  Add salt to boiling chicken.   Add prepared vegetables and simmer for about an hour and 15 minutes.   Remove chicken to a separate bowl.  Remove chicken meat and return skin and bones back to the soup.  Simmer for another hour (if I am pressed for time, I don't put the skin and bones back in and don't simmer for another hour.)   Strain soup to remove all cooked vegetables and debris.   So now you can do a couple of different things. If I use all dark meat (thighs or legs), I cool the soup, put it in the refrigerator overnight, and then take all the fat off the top before reheating it and adding the mini carrots and celery and broccoli.   If you use less fatty chicken,
then as soon as you strain the soup, put it back on the heat and add mini carrots and celery.  DO NOT ADD BROCCOLI YET!  Simmer for about half an hour. Then turn off heat, add broccoli, and wait for about 20 minutes.  Add chicken meat.  The broccoli will be cooked and the soup will be ready to eat!

Friday, April 13, 2012

Guilt Free, I mean Gluten Free Brownies (ok for Passover too!)

I was excited when I looked at the brownie photo on Cookie Madness Gluten Free Almond Butter Brownies.  All it takes is a shiny-topped brownie to get my stomach juices going!!!  (My tops were not quite as shiny because, well, operator error probably!)


Almond butter brownies with Scarlet Tanager


And the addition of browned butter also excited me-I am a huge fan! ( And huge will have the literal meaning if I don't stop eating these brownies!)
So I hauled my lazy body out of the house in search of almond butter since I had everything else.  Well, as I was looking at each jar of almond butter to get the freshest date, I forgot the recipe called for creamy. Of course I brought home a jar of crunchy!  That turned out to be a happy accident because these brownies could use a bit of crunchy texture. I did make my usual minor recipe alterations (I just can't help myself).  I have to say these brownies produced the best crispy edges I've had!   Another thought I had while eating my third, yes third! brownie was that adding chocolate chips to the batter before baking would have been overkill-and I like chocolate chips in brownies most of the time.   You can cut these after cooled like regular brownies, or scoop them out while still a little warm and serve with vanilla ice cream.
Please try these brownies; you will not be disappointed if you like fudgy, a little nutty, and rich brownies!  Thank you Anna for posting these.
See the link at the top of this post for the recipe from Cookie madness.  

    Wednesday, March 21, 2012

    Anna's adapted Deluxe 8 Inch Pan Brownies

    I was so excited to see Anna's post on Cookie Madness  here today!  I tried it as soon as I saw it.  Sometimes a recipe just hits me hard between the eyes!  Also, I had all the simple ingredients. I only made ONE, yes, ONE change!   I followed her recipe exactly except I used salted butter (omitted the extra salt), and added 2 more tablespoons of flour, and used decaffeinated coffee.   OK.  You caught me.  I made THREE changes!  The crust is crispy and from Anna's teaching, I believe that is from beating the eggs for 3 minutes...They came out a little fudgier for me, but that may be because I just might have under baked them a bit.  I added the extra flour and I believe that helped the chocolate chips stay dispersed through out the batter and not sink.
    If you try them you won't be disappointed!
    See Anna's post for the recipe!

    The "flashy" photo

    Thursday, March 15, 2012

    Yummy, shiny, chocolate chip deliciousness

    Just a short post to steer you to some excellent CC cookies!  Darlene by way of Anna at Cookie Madness steered me to these cookies.   I made them twice.  The first time I added a 1/2 teaspoon almond extract.  Not so great.   The second time I made them with no changes (for a change).  Great.  I've eaten and baked a lot of cookies.  They are near or at the top of my list.   You can get the recipe here:  Lee's chocolate chip cookies See photos below of CCC and my neighbor's  rescued King Charles spaniel mix named Finnegan.  He is so cute I can't help but post him!!!


    Finnegan